A complete quality assurance program runs through seven core steps: define quality objectives and acceptance criteria → design the QA process and test plan → develop test cases and traceability → provision environments and tooling → execute tests and manage defects → report, measure KPIs, and sign off → run continuous improvement cycles including audits and CAPA. Shift-left early, automate where it delivers clear ROI, and keep documentation lean enough that teams actually use it. Two ground rules before you start: QA is process-focused and preventive, while quality control (QC) is inspection-focused and reactive — and ISO 9001 provides the internationally recognized framework that ties both together.
Core steps at a glance:
- Define quality objectives — translate business goals into measurable KPIs and acceptance criteria
- Design the QA process and test plan — scope, RACI, schedule, entry/exit criteria
- Develop test cases — scenarios, traceability matrix, risk-based prioritization
- Set up environments and tools — parity, automation frameworks, CI/CD, defect tracking
- Execute tests and manage defects — run cycles, triage bugs, verify fixes, prevent regressions
- Report and sign off — KPI dashboards, release reports, documented accepted risks
- Continuous improvement — audits, RCA, CAPA, retrospectives
Key takeaways
A mature QA program is built on seven sequential steps, owned across the whole organization, and measured continuously — not just at release gates.
| Point | Details |
|---|---|
| Start with measurable objectives | Define KPIs like defect escape rate, MTTR, and test coverage before writing a single test case. |
| Distribute ownership via RACI | Assign quality objectives to product owners and developers, not just QA engineers, to close handoff gaps. |
| Automate high-risk gates first | Begin with three to five automated checks on critical flows in CI before expanding automation coverage. |
| Track escape rate and MTTR | These two metrics are the leading indicators of QA program health; start reporting them immediately. |
| Treat improvement as a cycle | Run quarterly audits, RCA on every P1 escape, and CAPA with named owners and deadlines. |
Table of Contents
- What is QA and how does the QA lifecycle work?
- Step 1 — How do you define quality objectives and acceptance criteria?
- Step 2 — How do you design a QA process and test plan?
- Step 3 — How do you build test cases that actually cover your risks?
- Step 4 — What does a solid test environment and tooling setup look like?
- Step 5 — How do you run test cycles and manage defects effectively?
- Step 6 — What metrics and reports do stakeholders need before sign-off?
- Step 7 — How do you build a continuous improvement loop into QA?
- How do QA and QC differ, and which methods should you use?
- What does a realistic QA rollout look like in terms of timeline and cost?
- How do you embed QA checks into automated business processes?
- What actually separates QA programs that last from those that stall?
- How Singleclic helps you operationalize QA across your enterprise
- Sources
What is QA and how does the QA lifecycle work?
Quality assurance is the set of planned, systematic activities that build confidence a product or service will meet defined requirements before it reaches the customer. According to ASQ, QA is process-oriented and occurs across the entire lifecycle, while QC is product-oriented and typically happens at specific inspection points or upon completion. The practical difference: QA prevents defects from entering the process; QC catches them after the fact.
The QA process lifecycle covers requirements analysis, test planning, test design, environment setup, test execution, defect management, and reporting/sign-off. Each section of this guide maps directly to one of those stages, so you can read sequentially or jump to the phase you are currently working on.
Pro Tip: Treat QA as a business-wide responsibility, not a policing function. When developers, product owners, and operations teams share ownership of quality objectives, defect escape rates drop and release confidence rises.
Step 1 — How do you define quality objectives and acceptance criteria?
Every QA program starts with a clear answer to one question: what does “good” look like for this product or service? Without measurable targets, testing becomes subjective and sign-off becomes political.
Converting business goals into SMART quality objectives
Start with the product or service goal, then work backward to the quality attribute it depends on. A payment processing feature needs near-zero transaction failure rates. A customer portal needs sub-3-second load times. Each of those translates into a KPI you can measure and gate on.
Sample acceptance criteria checklist
- All critical-path user flows pass automated regression with no critical defects open
- Test coverage meets the agreed threshold for critical modules
- No unresolved security vulnerabilities at release
- Performance benchmarks met under defined load conditions
- All regulatory or compliance checkpoints verified and documented
ISO 9001 provides the framework for documenting these objectives in SOPs and quality plans, making them auditable and repeatable across releases. The standard’s emphasis on leadership commitment and risk-based decision-making means your quality objectives need executive sponsorship, not just QA team buy-in.
Step 2 — How do you design a QA process and test plan?
A test plan is the contract between QA, development, and the business. It answers who tests what, when, under what conditions, and what “done” means. The U.S. Chamber of Commerce guidance recommends starting by determining quality standards and creating documented policies before any testing begins.
Essential test plan sections
- Objectives — what the test cycle must prove
- Scope — features and integrations in scope; explicit out-of-scope list
- Entry criteria — conditions that must be true before testing starts (e.g., build deployed to test environment, smoke test passed)
- Exit criteria — conditions that must be true before the cycle closes (e.g., pass rate ≥ 95%, zero open P1 defects)
- Environments — which environments, data sets, and integration stubs are required
- Risk areas — modules or integrations with the highest defect probability or business impact
- Schedule — milestone dates for each phase
RACI responsibility matrix
For Agile and DevOps teams, the test plan lives as a living document in your sprint or release wiki. Milestone-driven programs (waterfall or hybrid) benefit from a formal sign-off on the plan before test design begins. Either way, keep the document lean — documentation bloat is a recognized pitfall where teams produce SOPs so detailed that practitioners ignore them entirely.
Step 3 — How do you build test cases that actually cover your risks?
Test design is where quality objectives become executable checks. A well-structured test case removes ambiguity from execution and makes results reproducible across testers and environments.
Practical test case template
Each test case should capture:
- ID and title — unique reference and a plain-language description
- Linked requirement — the user story, requirement ID, or acceptance criterion being verified
- Preconditions — system state and data required before execution
- Steps — numbered actions the tester performs
- Test data — specific inputs, including edge cases and boundary values
- Expected result — the exact outcome that constitutes a pass
- Tags — priority, risk level, component, automation status
Building a traceability matrix
A requirements-to-test-case traceability matrix maps every requirement to at least one test case and every test case back to a requirement. Track these columns: requirement ID, requirement description, test case IDs, execution status, and defect IDs. The matrix makes coverage gaps visible before execution and gives auditors a clear line of sight from business need to verified outcome.
Pro Tip: Use risk-based testing to prioritize your test suite. Score each feature area by likelihood of failure and business impact, then allocate the most test cases and automation effort to the highest-scoring areas. This keeps QA capacity focused where escapes hurt most.
For software teams, the QA process guidance from Testlio recommends treating test data management as a first-class concern at this stage: mask production data for privacy, version test data sets alongside schema changes, and use sandbox seeding scripts to guarantee reproducible results across environments.
Step 4 — What does a solid test environment and tooling setup look like?
Environment parity is the single most common source of “it works on my machine” failures. If your test environment does not match production in configuration, data volume, and integration behavior, your test results will not predict production behavior.
Environment parity checklist
- Configuration files and feature flags match production values (or are explicitly documented as different)
- Database schema and representative data volumes are current
- All third-party integration points are either live stubs or contract-tested mocks
- Security controls (TLS, auth, secrets management) mirror production settings
- Environment is refreshed or re-seeded before each major test cycle
Tool categories to evaluate
- Test automation frameworks — Selenium, Playwright, Cypress for UI; REST Assured or Postman for API; JUnit/TestNG/pytest for unit and integration
- CI/CD pipelines — Jenkins, GitHub Actions, GitLab CI, Azure DevOps for triggering automated test suites on every commit
- Test management platforms — Jira + Zephyr, TestRail, or Xray for organizing test cases, cycles, and results
- Defect tracking — Jira, Azure DevOps Boards, or Linear for logging, triaging, and tracking bugs to closure
- Synthetic monitoring — Datadog, New Relic, or Dynatrace for production-like performance checks
Pro Tip: Automate the smallest repeatable gate that prevents high-risk escapes first — for example, automated acceptance tests in CI for critical flows like payment or authentication. Expand coverage based on measured return on investment. Brittle automation that generates false positives erodes team trust faster than no automation at all.
For a deeper look at how automation frameworks connect to software QA practices, the companion guide covers toolchain selection in more detail.
Step 5 — How do you run test cycles and manage defects effectively?
Test execution is where plans meet reality. The goal is not just to find defects — it is to find them fast, route them correctly, and verify fixes without introducing regressions.

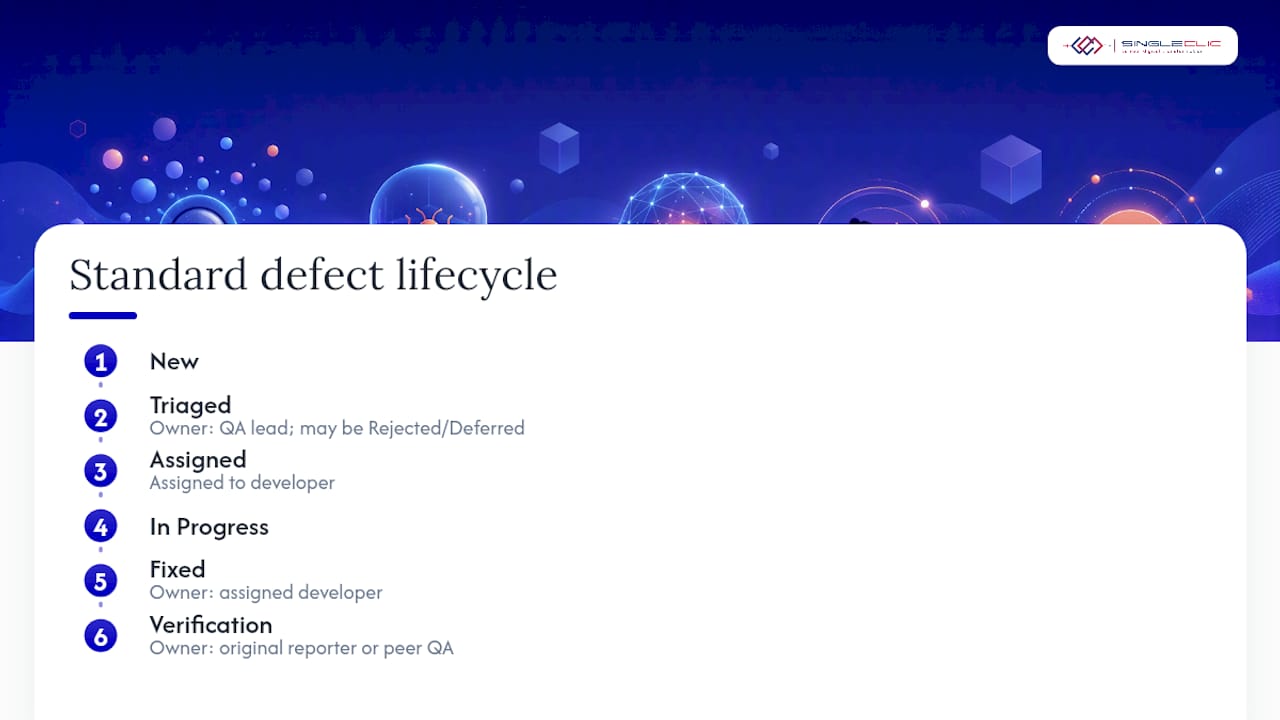
Standard defect lifecycle
A defect moves through these states: New → Triaged → Assigned → In Progress → Fixed → Verification → Closed (or Rejected / Deferred if the team decides not to fix it in this cycle). The QA lead owns triage; the assigned developer owns the fix; the original reporter or a peer QA engineer owns verification.
Severity and priority matrix
| Severity | Priority | Routing | Target response |
|---|---|---|---|
| Critical (system down, data loss) | P1 | Immediate escalation to lead and product owner | High urgency response as determined by organizational standards |
| High (major feature broken, no workaround) | P2 | Assigned promptly | Priority response according to business needs |
| Medium (feature degraded, workaround exists) | P3 | Assigned in upcoming development cycle | Addressed within planned timelines |
| Low (cosmetic, minor UX) | P4 | Backlog, prioritized by product owner | Deferred or scheduled for future releases |
Adapt these thresholds to your risk profile and operational context.
Bug report must-haves
Every defect report should capture:
- Steps to reproduce — numbered, specific, and repeatable
- Environment details — OS, browser/app version, build number, test data used
- Expected vs. actual result — stated plainly
- Severity and priority — assigned at triage, not by the reporter alone
- Attachments — screenshots, logs, HAR files, or video where relevant
Pro Tip: Run a brief daily defect triage standup during active test cycles. Ten minutes with QA, development, and the product owner prevents defects from sitting unassigned and keeps the cycle moving toward exit criteria.
Step 6 — What metrics and reports do stakeholders need before sign-off?
Reporting translates test results into a business decision. Product owners and release managers need enough signal to accept or defer a release — not a raw list of test cases.
Key QA metrics and their owners
| Metric | Definition | Owner |
|---|---|---|
| Defect density | Defects found per feature area or story point | QA Lead |
| Defect escape rate | Defects found in production / total defects found | QA Lead + Engineering Manager |
| Test pass rate | Passing test cases / total executed | QA Engineer |
| MTTR | Average time from defect open to verified closed | Engineering Manager |
| Test coverage | Requirements with at least one passing test / total requirements | QA Lead |
Sign-off criteria vs. the zero-bug fallacy
Requiring zero open defects before release is rarely realistic and often counterproductive. Instead, define sign-off criteria by severity: zero open P1 and P2 defects, all P3 defects documented with accepted-risk sign-off from the product owner, and P4 items logged in the backlog. Document accepted risks explicitly — the product owner signs a release acceptance note that names each deferred defect and its business justification. This creates an audit trail and removes ambiguity about what was knowingly shipped.
Step 7 — How do you build a continuous improvement loop into QA?
A QA program that does not evolve becomes a checklist. ISO guidance is explicit: strong quality assurance requires leadership commitment, audits, corrective action validation, and risk-based decision making as ongoing activities, not one-time setup tasks.
Capability improvement checklist
- Run retrospectives after each release cycle — what failed, what was slow, what should be automated next
- Conduct periodic QA audits — review test coverage, defect trends, and process adherence quarterly
- Perform root cause analysis (RCA) on every P1 escape and any recurring defect pattern
- Document CAPA — assign a corrective action owner, a preventive action, and a deadline
- Track KPIs over time — defect escape rate and MTTR are the two leading indicators of program health
RCA in practice: the 5 Whys
A P1 defect escapes to production in a payment flow. Ask why five times:
- Why did the defect reach production? The regression suite did not cover this code path.
- Why was the path not covered? The test case was written against an outdated requirement.
- Why was the requirement outdated? The developer updated the spec without notifying QA.
- Why was QA not notified? There is no change-notification step in the development workflow.
- Why does that step not exist? The process was never defined for mid-sprint requirement changes.
CAPA: Add a mandatory QA notification step to the change-request workflow (corrective action). Add a weekly requirement-change review to the sprint ceremony (preventive action). Assign the QA lead as owner with a two-week deadline.
Pro Tip: Audit cadence matters. Quarterly QA audits catch drift before it compounds; annual audits catch it after it has already damaged release quality. Set a calendar reminder now.
How do QA and QC differ, and which methods should you use?
The distinction matters because mixing up QA and QC leads to misallocated effort. ASQ defines QA as planned, systematic, process-focused activities that provide confidence a product will meet requirements. QC is the operational techniques and inspections used to fulfill those requirements at specific checkpoints.
- QA — process design, standards, training, audits, CAPA; happens throughout the lifecycle
- QC — inspections, sampling, in-process checks, nonconformance reporting; happens at defined gates
Common methods and when to use them
- Six Sigma (DMAIC) — best for reducing process variation in manufacturing, services, or transactional workflows with measurable defect rates
- Statistical Process Control (SPC) — ideal for high-volume manufacturing where real-time monitoring of process parameters prevents out-of-spec output
- Total Quality Management (TQM) — a culture-wide approach suited to organizations committing to long-term quality as a strategic value
- Lean QA — eliminates waste in test processes; useful when test cycles are long and manual effort is high
- Automated QA — regression, performance, and API testing in CI/CD pipelines; highest ROI for software teams with frequent release cadences
- AI-assisted QA — Zendesk’s operational QA guidance recommends using AI as a first line of detection and automatic routing to human reviewers, combining automated and human review for scale
Pick methods that match your organizational maturity. A team running its first formal QA program should start with documented test cases and a basic defect tracker before investing in AI-assisted tooling.
What does a realistic QA rollout look like in terms of timeline and cost?
Pro Tip: Budget for test environment provisioning and automation engineering time before you budget for test management tooling. Environments and automation capacity are the two constraints that most often delay QA programs.
Three timeline examples
Small pilot (4–6 weeks): One product area, two to three QA engineers, manual test cases with basic automation for smoke tests. Milestones: week 1 — objectives and test plan; weeks 2–3 — test case development; weeks 4–5 — execution and defect triage; week 6 — retrospective and CAPA.
Medium program (3–6 months): Multiple product lines or a full application, a dedicated QA team of four to eight, automation covering critical paths. Milestones: month 1 — standards, tooling selection, environment setup; months 2–3 — test design and automation build; months 4–5 — full execution cycles; month 6 — audit and continuous improvement framework.
Large enterprise rollout (6–12+ months): Cross-functional program spanning multiple systems, 10+ QA engineers plus automation specialists, integration with CI/CD and release management. Milestones: months 1–2 — governance, RACI, tooling procurement; months 3–5 — environment parity and automation pipeline; months 6–9 — phased execution; months 10–12 — audit, optimization, and knowledge transfer.
Primary cost drivers
- Tooling licenses (test management, automation frameworks, CI/CD infrastructure)
- Automation engineering time (often the largest single cost in mature programs)
- Test environment provisioning and maintenance
- Test data creation, masking, and management
- QA team training and certification
- Third-party test services (performance testing, security testing, accessibility audits)
Team sizing follows a rough pattern: small programs need one QA lead plus one to two engineers; medium programs need one lead, three to five engineers, and one automation specialist; enterprise programs add a QA architect, multiple automation engineers, and often a dedicated test data engineer.
How do you embed QA checks into automated business processes?
Embedding quality gates directly into automated workflows is where QA shifts from a phase to a continuous control. This is the practical application of shift-left thinking: defects caught by an automated gate in a CI pipeline or a BPM approval workflow cost a fraction of what they cost when found in production.
Patterns that work in practice:
- Pre-commit hooks — run linting, unit tests, and security scans before code reaches the shared branch
- Automated acceptance tests in CI — trigger a focused suite of business-critical tests on every pull request merge; block the pipeline on failure
- Automated approval gates in BPM — embed data validation, compliance checks, and SLA verification as workflow steps that must pass before a process advances
- Synthetic monitoring — run scripted user journeys against production continuously to catch regressions between releases
Singleclic’s Cortex low-code and BPM platform connects approvals, ERP data, CRM records, legacy systems, and workflows into a single process layer, making it practical to embed QA checkpoints without writing custom integration code. For teams planning this kind of process automation, the architecture decisions made at the workflow design stage determine how maintainable those gates are long-term.
Risks to manage when automating QA gates:
- Test data security — automated pipelines that pull production data into test environments create compliance exposure; use masked or synthetically generated data sets
- Brittle automation — gates that fail on minor UI or schema changes generate noise and erode trust; invest in stable selectors and contract-based API tests
- Monitoring blind spots — automated gates cover known scenarios; pair them with anomaly detection to catch unknown failure modes
Pro Tip: *Start with a small set of high-value gates — three to five automated checks on your highest-risk flows — and measure false positive rates before expanding.
For low-code automation steps that map directly to embedding QA gates in business workflows, the implementation patterns translate cleanly across industries.
What actually separates QA programs that last from those that stall?
The most common failure mode in QA implementation is not tooling. It is culture and ownership misalignment. Teams invest in test management platforms and automation frameworks, then watch adoption stall because developers see QA as a handoff gate rather than a shared responsibility, and QA engineers feel isolated from product decisions.
The fix is structural, not motivational. Assign quality objectives to product owners, not just QA leads. Include QA engineers in sprint planning and requirement reviews, not just test execution. Tie release metrics — defect escape rate, MTTR — to engineering team goals, not just QA scorecards. When the incentives align, the culture follows.
The measurable impact of getting this right shows up in escape rates and cycle time. Organizations that embed QA earlier in the development process and distribute ownership across roles consistently reduce the cost and frequency of production incidents. The ISO framework supports this directly: leadership commitment and cross-functional accountability are prerequisites for a quality management system that delivers sustained results, not just initial compliance.
For leaders starting this work, one concrete action in the next 30 days: run a single retrospective focused entirely on where defects are being found in your current process. Map each defect to the stage where it was introduced versus the stage where it was caught. That gap analysis will tell you exactly where to invest first, whether that is earlier requirement reviews, more automated gates in CI, or better defect triage discipline.
How Singleclic helps you operationalize QA across your enterprise
Singleclic works with enterprises across Saudi Arabia, the UAE, and Egypt to embed quality controls directly into business operations, not just software pipelines. Through Microsoft Dynamics 365, Odoo, IBM BAW, and the Cortex low-code platform, Singleclic designs QA gates, approval workflows, and compliance checkpoints that run automatically as part of daily processes — in healthcare, banking, construction, and government sectors.
If your QA program is still a manual checklist or a siloed testing phase, explore how connected ERP and intelligent automation can make quality a built-in property of your operations rather than an afterthought.
Sources
- Quality Assurance vs Quality Control: QA vs QC | ASQ
- ISO – Quality assurance: A critical ingredient for organizational success
- How to Develop a QA Process for Your Business | U.S. Chamber